


The importance of the striking shield for the development of safe and effective simulation training is often misunderstood and, therefore, oftentimes underutilized. Understanding how and when to use striking shields will speed training, improve confidence, and add to the overall quality of your training program. In an effort to meet training requirements in a short period of time, it’s not uncommon to see officers pushed too fast into high-level decision making scenarios before they have had the opportunity to develop the basic skills required. This leads to injuries and poor performance that could have been avoided with a strong foundation built on training with striking shields. By using a shield that can be used for both training and duty, you will also be able to stretch your budget further.
Training Philosophy
In the 1980s I worked alongside Larry Nadeau and Richard Rosenkranz to develop the Seven Levels of Simulation. The basic premise behind the seven levels is to provide trainers with the foundation to conduct defensive tactics training in a progressive format that moves from the simple to the complex and from basic instruction to high level decision making scenarios. The seven levels, as well as some examples, are outlined in the table to the right.
Before we go any further, take a couple of moments to check out this Seven Levels of Simulation Video. By following the steps outlined in this short video, your officer’s confidence and competence can be markedly increased with startling improvements in their decision making and technique retention as they progress into high level simulations.
Type | Example |
Shadow Training | Shadow Boxing |
Prop Training | Baton techniques done in the air |
Partner Training | Slow repetitions done with a partner |
Dynamic Movement Training | Hitting on the Move |
Relative Positioning Training | Ground Fighting |
Environmental Factor Training | Low Light / Fighting on a Staircase |
High Level Simulation | Final Decision Making Scenarios |
Getting Started
Before you begin a defensive tactics training program, you should make sure that you allocate enough time to demonstrate the tactic first, explain the tactic second, practice the basic technique third, and then add real world complexities and decision making fourth.
The practice should begin with Shadow Training, Prop Training, and Partner Training. You make sure that your officers can perform the technique without a partner first then add props, if necessary, like your TASER, OC Spray, Baton, or Firearm. Once they are familiar with their technique and/or weapon, you can add a partner. This doesn’t mean that we start with full speed and power application of technique. You need to start with “By the Number” and “Slow for Form” application of technique before advancing to “Full Speed and Power” applications. This will prevent injuries to both the officer practicing the technique and the officer being practiced on. Instructors have learned a number of very important lessons on how to train properly while avoiding costly mistakes.
Safety Rules
Safety Rules should be reviewed prior to training. You can’t expect officers to follow the training safety rules if you don’t review them prior to training.
Even more important, in these litigious times, making sure that you can prove that you explained the rules to your officers — and that they understood — helps to hold them accountable. This is why some instructors video their classes and/or have their officers sign off on and turn in written copies of the safety rules. You can use this Sample Training Safety Rules as a template.
Touch Drills
Practice Touch Drills for both empty hand control strikes and baton strikes prior to utilizing the striking shields.
Touch Drills are designed as extremely light (touch) drills to the intended target area of an empty hand or baton strikes. Performing these empty hand strikes to another officer’s body allows the officer striking to understand exactly where they are supposed to strike on an officer’s body. Baton strikes are performed with padded practice baton to minimize the chance of injury. This also helps to insure that the officer hitting the striking shield will hit the target area accurately with proper technique. Even the officer getting “touched” benefits from feeling a no-intensity touch to his body because s/he now knows exactly where the “classroom model” target area is. You would be surprised how helpful this is in courtroom testimony when the officer can accurately state and demonstrate exactly where s/he was attempting to strike – no matter where the strike actually landed during the dynamic application of technique.
Photographs by Gary T. Klugiewicz |
Target (Intensity) Training Rate Concept
All protective training gear is designed to take difference levels of trauma. You need to use the right equipment in the right drill at the right intensity levels. This is true of protective training gear that an officer wears, as well as, the striking shield that the officer strikes and another officer holds. Just because an officer is holding a thick striking shield, it doesn’t mean that either the officer striking or the officer holding the striking shield can’t be injured.
History has shown that injuries can occur. Instructor controlling the intensity and cadence of the drills will do much to minimize the chance of injury. The officer holding the striking shield also needs to be a realistic target which means that when struck the officer holding the striking shield needs to “give ground” to simulate what happens when someone strikes a real person. This tactic will be discussed in detail in a future column.
Again, the instructor is responsible for setting and monitoring the right intensity level bases on the equipment being used and the officers performing the drills.
Foundational Safety Issues
Proper use of the striking shields begins with following some foundational safety issues, knowing how to stand while holding the striking shield, and knowing how to hold the striking shield bases on the type of impact being delivered. Some of theses Foundational Safety Issues include:
Use of Mouthguards
All participants in physical trauma drills should wear mouth guards. Because of the nature of striking shields, the holder is actually in more danger from injuries than the striker. There as single and double Mouthguards — the double mouthguard actually provides more protection because it protects both from physical trauma to the mouth area, chipped teeth due to trauma delivered to the striking shield, and damage to the jaw from trauma to the lower face area.
Partner Selection
Striking shields are best utilized when the partners are relatively same strength and intensity levels. Although great confidence can be developed when a smaller officer delivers effective strikes to a larger and/or more intense officer, when the tables are turned bad things can happen. When a stronger and/or more intense officer hammers a smaller officer, injuries can occur and rather than building confidence, you can destroy any confidence the officer had. Size is also a factor — injuries sometime occur when there is a size disparage exists and either the smaller officer or the taller officer misses the striking shield.
Partner Feedback
Giving your partner feedback on power development and know when to lighten up. In training, giving you partner immediate feedback can be very helpful in building both strong strikes and an officer confidence in themselves. This also serves a safety feature that allows the officer to tell his partner to lighten up before injuries occur. See Number Three above. Monitoring class safety and intensity levels can be improved by implementing the Three Officer Safety Procedure Option. What you do is make every third officer in your class a safety officer. Let’s say you have twenty-four students in your class with two instructors. This means that each instructor has to watch six groups of two officer groups using the striking shield. By implementing this procedure, each instructor only has to watch four groups with each one of these groups having a safety officer. This system allows the instructor to watch each individual group more closely while allowing each group’s safety officer to help keep everyone safe.
How to Stand While Holding the Striking Shield
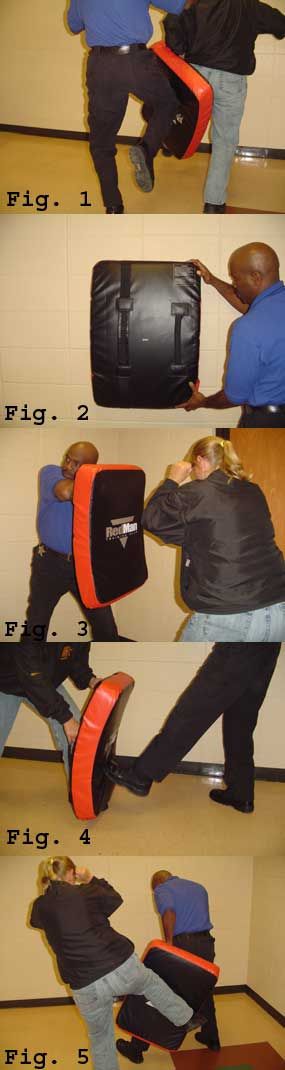
We have discovered by “trial and error” over the years that the way you stand when you hold the striking shield is critical in preventing injury to the officer holding the striking shield. No matter how the striking shield is held, it is important to keep the striking shield at a perpendicular to the knee with the knees bent (see Fig. 1, in the photo to the right).This is critical with dealing with strikes directed to the legs.
How to Hold the Striking Shield
We have developed three types of grips for holding the striking shield although there are several manufacturers that produce these striking shields these training impact bags are constructed with the same strapping systems for holding this equipment. An officer holds the striking shield differently based on what strikes are being directed at the striking shield. For our purposes these straps are called the “Thick Strap,” the “Thin Strap,” and the “Short Strap” (see Fig. 2 in the photo to the right).
The Standard Grip (see Fig. 3) is used for most of the empty hand strikes that come into the upper body including punches, forearms, and knee strikes.
The High Low Grip (see Fig. 4) is used for front and heel kicks directed to the lower body along with many baton strikes. This grip allow for the officer to quickly move the striking shield quickly for rapid sequenced baton strikes.
The Short Strap Grip (see Fig. 5) is used extensively for knee and angle kicks directed to the legs. The use of this grip held behind the legs allows for high impact practice while protecting the officer holding the striking shield from injuries associated with strikes directed to the side of the knee.
The uses of the striking shields for defensive tactics training are only limited by an instructor’s imagination. There are all types of Specialized Grips that have been developed to assist with specialized training functions. Dave Young of Arma Training is a longtime instructor of specialized Riot Control, Ground Defense, and Water Survival Training.
Watch some of the videos by Dave Young (links to BLUtube posted below) showing different non-traditional uses of the striking shields in training.
• Arma Training Video: Hammer Strikes on Supine Subject
• Arma Training Video: Knee Strikes from the Ground
• Arma Training Video: Riot Shield Strikes
Conclusion
Striking shields should be an integral component of your defensive tactics training. This equipment is a vital component of your ability to provide basic training to your officers. It allows them to gain confidence in their tactics and techniques. It is a building block to get your officers proficient enough to more on to more strenuous protective equipment drills until they are finally ready for high level, decision making scenario training.
Striking shields are not just for static training drills but can be used for dynamic movement training, relative positioning training, environmental factors training, and even for limited decision-making training. These are topics that we will cover in future columns. The purpose of this article was get you to re-evaluate the use of striking shields in order to make the best use of this valuable piece of equipment. If you are using them now, this is great news. If not, dust them off and start using them. Make sure to watch for future articles where we will show you how to use striking shields more extensively in your training programs.
